School Projects

Fun Projects

Monday, September 30, 2013

"LOOK MOM!"

The other day, while I was working on my shutter removal project, Ian came running to find me.  As he ran he shouted "HEY MOM, LOOK WHAT I MADE!" 
I paused to examine his little creation and found that he had made a puppet from an empty toilet paper roll, some scrap paper, and markers.  I showed suitable excitement and admiration, and then out of curiosity asked "Where did you get the empty tube?"
He paused in his excitement...."Um....oh....it was empty!!"  Then he rushed on, before I could pursue the toilet paper question further: "Look, my puppet has loose teeth!"
I decided it was better to be pleased at the creativity and pretend not to be concerned about the possible toilet paper problem.  After all, he made a project, right?

Happy puppetry, everyone!


Linked up at:
Highhill Homeschool

Thursday, September 26, 2013

A Not So Sad Goodbye

This is the east side of our house.  How many of you notice something hideous?  Try to limit yourself to one item, because there are a couple of things I can see that I would like to change, but only one is the focus of this post.  Have you made your choice?  How many of you picked the pink, non-functional, not-quite-even, clearly homemade, "oops we forgot two sets" shutters?  Good, I'm glad I'm not the only one who hated them.
 I have despised those shutters since we bought the house.  Firstly, they don't match the shutters on the front of the house, in either size, material, or style.  Secondly, I had to repaint them the first summer we lived in the house, and the paint color that was supposed to match turned out to be a tad too close to hot pink.  Thirdly, how did the installer miss the other two windows?  Fourthly, I just don't care that much for shutters, especially shutters that are clearly not intended  to serve as window covers in the event of a natural disaster.  I could probably find a few more reasons I dislike them, but I don't want to belabor the point.

I suppose that by now you are wondering to yourself "if she hated them that much, why didn't she do something about them before now?" It is a fair and reasonable question, and the answer is simple: they weren't a high priority.  Projects like fixing the foundation took precedence.  The shutters hurt my eyes, but they didn't pose an actual health risk.
This summer, though, the house was no longer in danger of caving in on itself, and some of the more mundane projects got bumped higher on the priority list.  One of those projects was scraping and painting the window trim.  When I reached the east side of the house, I encountered a delightful surprise:
 The shutters were falling apart!  The one in the picture was held together only by the layer of hot pink paint I applied 6 years ago.  With that discovery in hand, I was given spousal approval to remove the offending decorative elements, which I did as quickly as I could.  I estimate it took the better part of five minutes to pull all four of them off of the siding.
 Then my little helpers carried the pieces to the fire pit and I burned them up.  It was a very satisfying bonfire.
 And here it is again: the clean(er) east end of my house.  All it needs now is a little bit of landscaping!
I like it so much better!  Don't you?
Happy shutter removal everyone!

Monday, September 23, 2013

Happy Birthday Garland

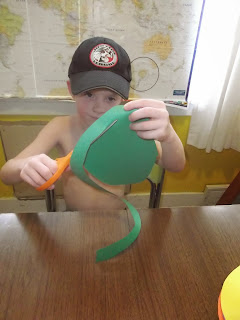
 Hello to all!  We got home safely from our Road Trip Vacation to Boston, spent about 20 hours recovering, and jumped right into the first week of school.  It was a bit of a whirlwind around here, but with Blair's third birthday party yesterday, I finally got back into the project-ing mood.  On Saturday the big kids wanted to make their kid sister some party decorations, so I handed them construction paper and scissors and taught them how to cut spirals.
 Brynnie was proud to announce that she knew what a spiral was: "Mom, it's like the staircase in the Bunker Hill Monument!"  Yes, my girl, it is, and you should know because you climbed every single one of those steps!
 We also cut some from square shapes for a different look.
 Just a little tip: use cardstock if you can (we didn't have any) - construction paper is a little flimsy for this project.
 I had pinned this garland on Pinterest a while back, but when I tried to follow the website link it didn't work anymore.  Oh well, I usually wing these things anyway.
I stacked six pieces of construction paper, drew circles using a glass, and cut them out.  I got 12 circles on one stack of paper, and I used two stacks.  It was plenty for one garland.  Like the spirals above, I think lightweight cardstock would have been a better choice for this project, but I wasn't going to make a special Hobby Lobby run for it and I just used what was on hand.
I kept the papers stacked in the same order and just rotated which color was on top, 
then I basted them together.  I didn't know how my machine would handle six sheets of paper, but I had no problems at all.
 I spaced the first few sets of circles about four inches apart, but that looked silly, so the rest are all about half an inch apart.   It looks much better, right?
 After all the circles were sewn on (it took about 20 minutes), I "fluffed" the circles by grabbing about half the papers (I did not count, that is why it was "about half") and pinching them one way while pinching the other half the other way.  They popped back open, separating into the different colors and sort of spinning on the threads.
 Then it was time to decorate for the party!
 And make a cake.  Since Blair's nick-name is "Brownie" everyone thought that making frosted Brownies was the best choice for cake.
 She loved her party!
 And for those who didn't like brownies, the other birthday girl (Me) requested an angel food cake with yellow frosting.
Happy Birthday, Blair!

Tuesday, September 3, 2013

The Last Official Summer Project

This past weekend my baby sister was home for a visit after her first couple of weeks of being away at school.  To celebrate her grown-up status, we hosted a bonfire for the family so that we could all eat yummy snacks - mostly s'mores - and get all caught up on the goings-on.  I decided it would be fun to do a big group project to end the summer on a high note, and nothing says high note of summer like tie dye.

If you are "on Pinterest" you can't help but see pins of the Sharpie Tie-Dye method, which made me curious, so I decided to give that a try.  It seemed kid friendly and quick enough to manage on a summer evening before the sun went down.  My sister-in-law and my sister and my mom were willing to go along for the ride as well.  If you want to know how to do it, just check Pinterest.  You will find lots of ideas and methods and you can choose what works best for you.
I tried one t-shirt with cardboard between the layers and a single big design.
 All the other t-shirts were done using the "stretch the fabric over a cup and hold it tight with a rubber band" method.
 After the dots and lines were drawn, we dripped the rubbing alcohol onto the fabric.  It was kinda cool to watch the ink run.  Different colors reacted in different ways, so if you are persnickety about your colors touching you might want to practice on a scrap of fabric first 
We let the shirts air dry for a while, and then I tossed them into the dryer to finish setting the dye (that was a Pinterest tip, it seemed like a good idea to me).  I didn't get any pictures of the finished t-shirts because it was dark before they came out of the dryer, and then the next day my kids wore the shirts and got them filthy before I could find my camera.  Sigh.  Someday my kids will stop sabotaging my blogging efforts.
Using Sharpies is definitely faster and easier then the old-fashioned method of rubber bands and fabric dye.  You should try it sometime!
Happy Tie-Dye, Everyone!

P.S. We will be leaving on our annual trip in three days, so I will be taking a blogging vacation for a while.  Check back in two weeks for a report on our traveling projects!  (Or disasters - you'll have to wait and see.)